
EZ Start Kit+ (LinkIt)
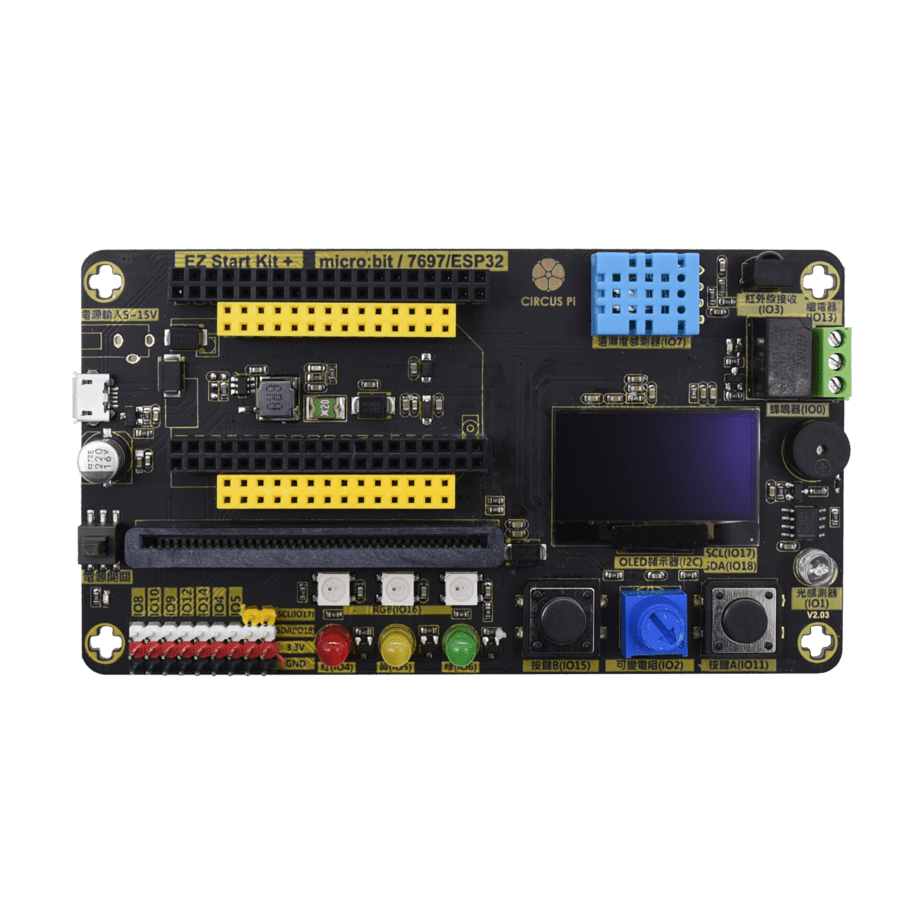
EZ Start Kit+ (LinkIt) is a 3-in-1 expansion board that lets you choose a micro:bit, LinkIt 7697, or ESP32 development board to fit each project. With BlocklyDuino block coding, it takes students from LEDs and sensors all the way to an IoT environmental monitoring project.
What this kit teaches
Course setup to LEDs
Getting to know the 7697 board, getting to know the EZ Start Kit, installing the BlocklyDuino v3 block editor, my first 7697 program (OLED), OLED animation practice, and custom OLED animations.
Buttons and variable resistors to infrared receiving
Reading button values, controlling an LED with a button, reading variable resistor values, controlling full-color LED brightness with a variable resistor, mixing LED colors with a variable resistor, and reading photoresistor values.
Buzzer experiments to an IoT environmental monitoring project
Simulating siren and ambulance sounds, single-tone MIDI music projects, campus air box, Taiwan air quality index lookup, weather lookup for cities worldwide and counties across Taiwan, and Wi-Fi connection.
Course outline
01 Course setup
Unit content
- Getting to know the 7697 board
- Getting to know the EZ Start Kit
- Installing the BlocklyDuino v3 block editor
Matching materials:CIRCUS Pi course outline “Easy Introduction to Playing with the 7697: Using the EZ Start Kit,” Unit 1
02 First steps with the 7697
Unit content
- My first 7697 program—OLED
- OLED animation practice
- Custom OLED animations
Matching materials:CIRCUS Pi course outline “Easy Introduction to Playing with the 7697: Using the EZ Start Kit,” Unit 2
03 Getting to know LEDs
Unit content
- LED experiments
- Red, yellow, and green LED traffic light experiment
- Fun with the WS2812 LED strip
- Breathing light simulation
Matching materials:CIRCUS Pi course outline “Easy Introduction to Playing with the 7697: Using the EZ Start Kit,” Unit 3
04 Buttons and variable resistors
Unit content
- Reading button values
- Controlling an LED with a button
- Reading variable resistor values
- Controlling full-color LED brightness with a variable resistor
- Mixing LED colors with a variable resistor
Matching materials:CIRCUS Pi course outline “Easy Introduction to Playing with the 7697: Using the EZ Start Kit,” Unit 4
05 Photoresistor experiment
Unit content
- Reading photoresistor values
- Night light project
Matching materials:CIRCUS Pi course outline “Easy Introduction to Playing with the 7697: Using the EZ Start Kit,” Unit 5
06 Infrared receiving experiment
Unit content
- Reading infrared remote control signals
- Dimming and brightening an LED with an infrared remote
Matching materials:CIRCUS Pi course outline “Easy Introduction to Playing with the 7697: Using the EZ Start Kit,” Unit 6
07 Buzzer experiment
Unit content
- Simulating siren and ambulance sounds
- Single-tone MIDI music project
Matching materials:CIRCUS Pi course outline “Easy Introduction to Playing with the 7697: Using the EZ Start Kit,” Unit 7
08 Web scraping applications
Unit content
- Campus air box
- Taiwan air quality index lookup
- Weather lookup for cities worldwide and counties across Taiwan
Matching materials:CIRCUS Pi course outline “Easy Introduction to Playing with the 7697: Using the EZ Start Kit,” Unit 8
09 IoT environmental monitoring project
Unit content
- Connecting to Wi-Fi
- Adding NTP
- Adding a DHT11 temperature and humidity sensor
- Uploading data to ThingSpeak
- Phone monitoring system
- Starting a fan based on temperature
- IFTTT temperature alerts
Matching materials:CIRCUS Pi course outline “Easy Introduction to Playing with the 7697: Using the EZ Start Kit,” Unit 9
The course outline is based on the official CIRCUS Pi course outline; please contact us for the number of class periods, which depends on each school’s schedule. The outline follows the earlier EZ Start Kit (LinkIt 7697) course outline; if the EZ Start Kit+ modules differ, please adjust to the actual kit.
Further reading
- Getting started with the EZ Start Kit: LinkIt 7697 (Part 1)
- Getting started with the EZ Start Kit: LinkIt 7697 (Part 2)
Hardware specifications
| Software and programming | ‧ SCRATCH ‧ MakeCode ‧ JavaScript ‧ Python ‧ Arduino IDE |
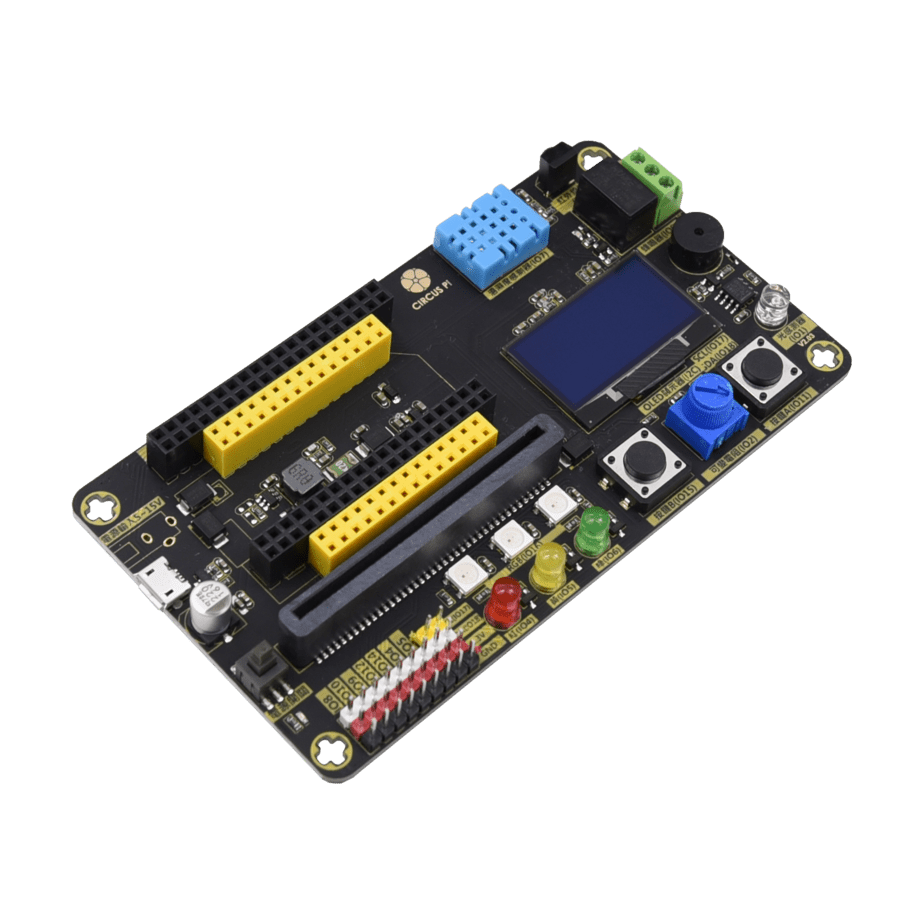
| Built-in features | ‧ SCRATCH ‧ Full-color RGB LED ‧ 5 mm round LEDs (red / yellow / green) ‧ DHT11 temperature and humidity sensor ‧ Infrared receiver ‧ Relay module ‧ Passive buzzer ‧ 1.3-inch OLED ‧ Light sensor ‧ Buttons ‧ Variable resistor ‧ micro:bit slot (expandable with micro:bit / Web:bit / 7697:bit breakout / pixel:bit / ESP32) ‧ LinkIt 7697 slot ‧ ESP32 slot |
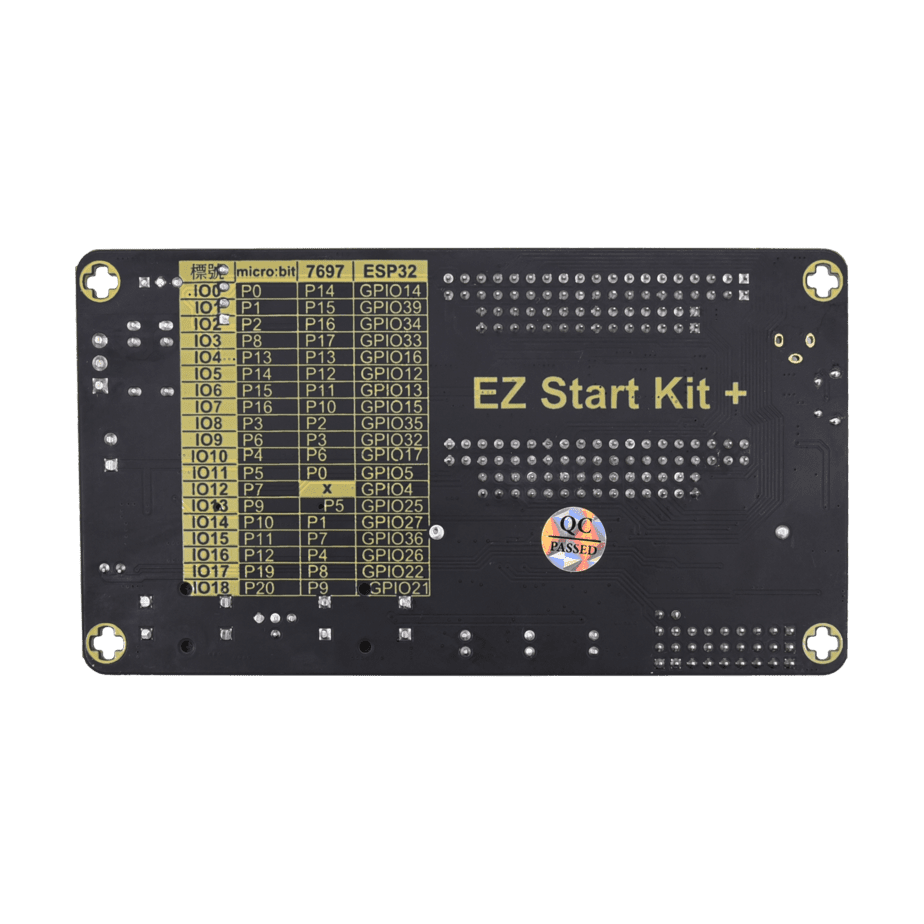
| Ports | ‧ I2C port ‧ micro:bit / LinkIt 7697 / ESP32 pins |
| Dimensions | 120 × 66 × 17 mm |
Product features
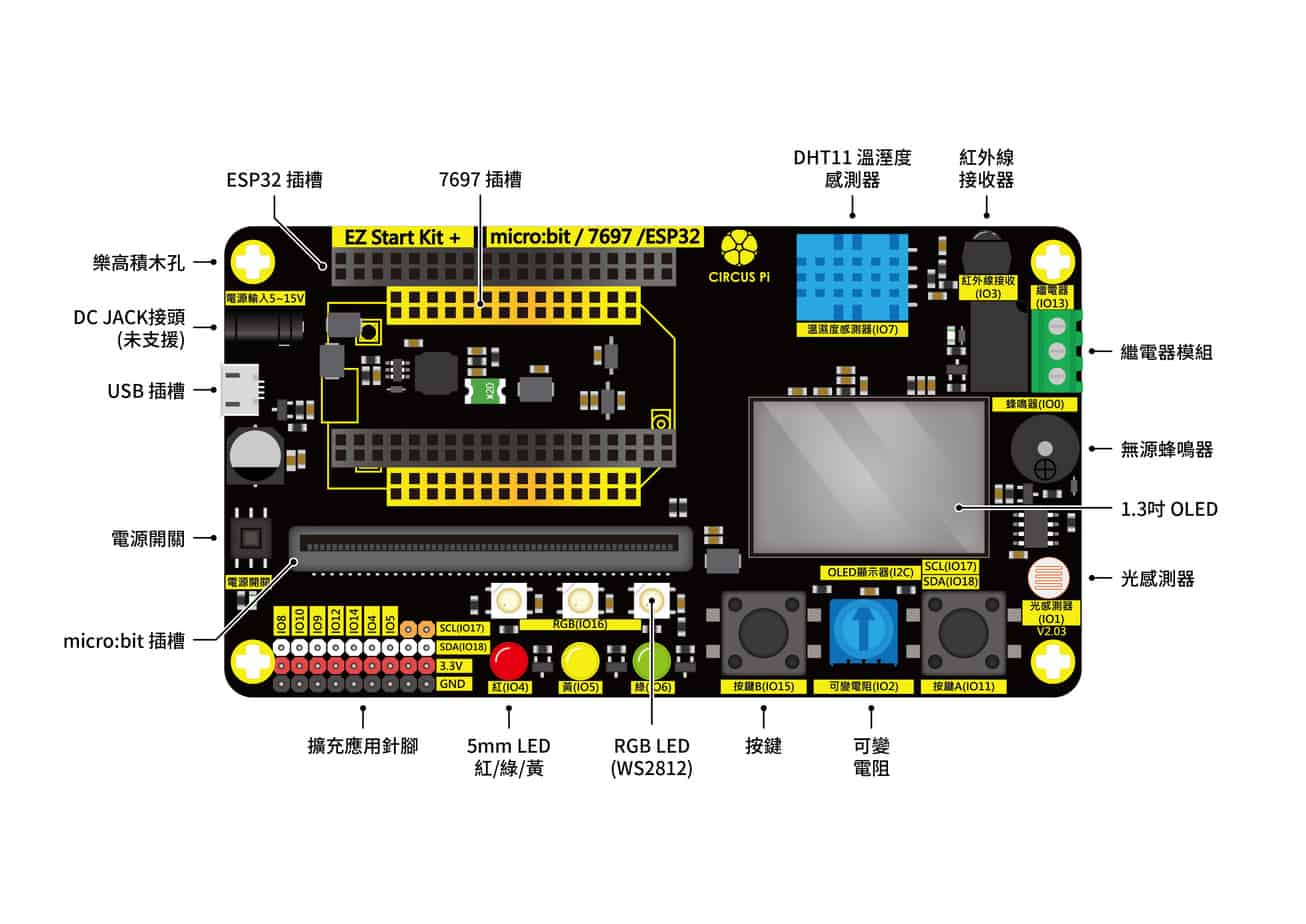
- 3-in-1 expansion board: Supports three types of development boards—micro:bit, LinkIt 7697, and ESP32—so you can choose a board to fit each project and work in more ways.
- LEGO brick holes: Compatible with LEGO-based projects.
- Buttons A and B: Black round buttons about 6.5 mm in diameter. The two buttons let you enter commands and control the expansion board.
- DHT11 temperature and humidity sensor: Measures temperature and humidity. It reads air temperature (0–50 degrees) and relative humidity (percent), and the readings can be shown on the 1.3-inch OLED display.
- Single-color LEDs: There are three colors—red, yellow, and green. With these three lights you can practice lighting an LED in code and also build a small traffic light project.
- Light sensor: Uses a photoresistor to detect ambient light intensity. Readings range from 0 to 4095; a higher value means stronger light.
- RGB LED: Above the single-color LEDs are the same number of RGB LEDs. Unlike ordinary color LEDs, they have a built-in driver chip, so a single signal line can light them in different colors.
- Passive buzzer: Makes sound under program control. You can also use it to play music you write yourself or as an alarm.
- Infrared receiver: Receives signals from an infrared remote control. An infrared remote is required to use this function.
- OLED display: A 1.3-inch OLED screen that shows sensor readings and can also be used for debugging programs.
- Relay: Its main function is to control a high-current component with a small current. In short, it is an electronic switch: it closes internally when powered and opens when not.
- Variable resistor: Reading the variable resistor in code gives a value from 0 to 4095, which you change by turning the knob. It can be used in projects that need adjustable control, such as setting LED brightness.
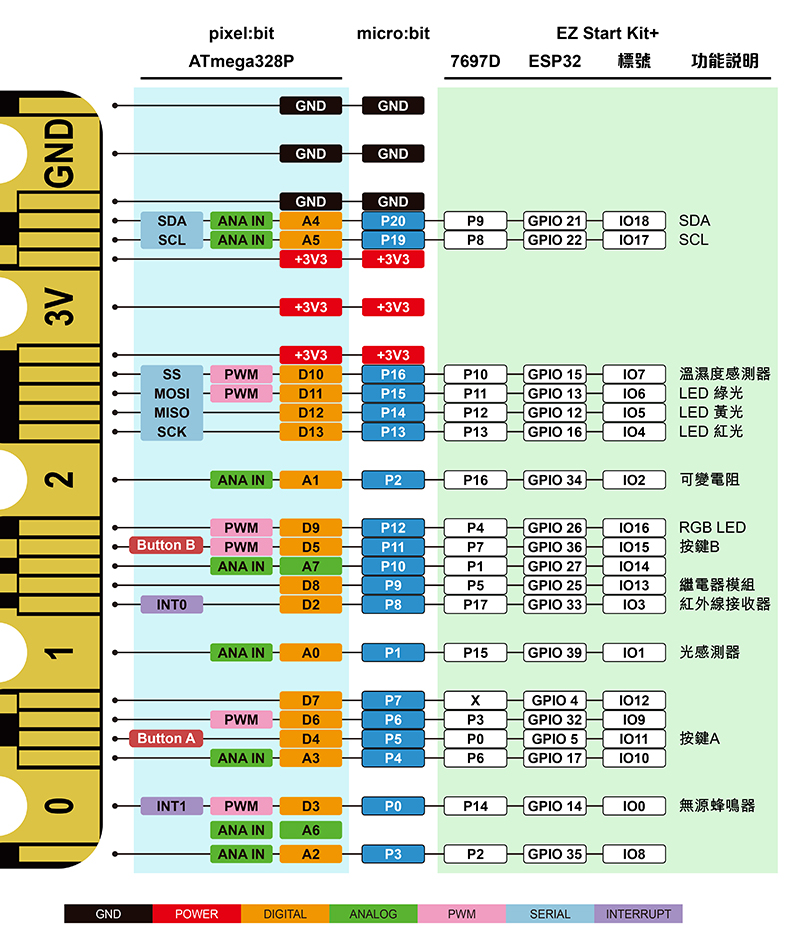
Related teaching resources
Teacher Liu Zhengji – Brother Ji’s Sharing
Teacher Huang Wenyu – Ayu’s Teaching Site
[BlocklyDuino] EZ START KIT block program download
FAQ
How do I use an ESP32 with the expansion board?
NodeMCU-32S is currently supported. Just plug the board into the dedicated EZ Start Kit+ slot.
Can the OLED display Chinese characters or specific graphics?
If you are using a micro:bit, MakeCode does not currently support this.
After I download the program, it starts running even though I haven’t moved the USB cable to the expansion board or turned on the expansion board’s switch. Is that normal?
Yes, that’s normal. Some components work on power from the micro:bit alone.
Why can’t files be imported between the MakeCode online version 7.0.8 and the offline version 6.0.3?
Because the versions differ. If a newer version changes MakeCode’s internal code, programs from the earlier version can no longer be imported.
Can I use an ESP32-CAM and an HC-SR04+ ultrasonic sensor with the EZ Start Kit+ for home security experiments?
The ESP32-CAM cannot be used, but the HC-SR04+ can be connected through the expansion header pins.
What is the OLED’s pixel X/Y coordinate range?
The OLED resolution is 128 × 64 pixels.
Can I plug in two micro USB cables at once?
With a micro:bit, you can connect two micro USB cables at the same time, so you don’t need to keep swapping the cable between powering the board and uploading programs. With a LinkIt 7697, just connect one cable to the EZ Start Kit to power the board and upload programs at the same time.
What other sensors can I experiment with on the EZ Start Kit+ expansion pins?
The EZ Start Kit+ expansion pins supply 3.3 V. Most sensors that support 3.3 V should work.
Can the onboard relay switch 110 V power?
Yes, the EZ Start Kit+ onboard relay can.
Video introduction
Online course
Contact us
Your message goes straight to our team, and we usually reply within one business day.
- 01Questions? Send us a message or add us on LINE.
- 02Quotes and orders, including international shipping
- 03Teacher training and professional development
Scan with your phone to add us on LINE.
Add us on LINE